My journey on building a remote Docker buildkit
Table of Contents
Context
Recently, I’ve been playing around with some hobby projects and need to build Docker images locally. I’m using an Apple Silicon machine, which is ARM64, and my VPS is x86, so I always build the image with multi-platform support.
I knew that the x86 image built using my laptop would use the QEMU emulator with some minor performance drawbacks. I thought it would be acceptable until I tried to do some serious compilations. The compilation process was awfully slow and one of the dependencies even failed to compile when using QEMU emulator on my laptop.
However, it compiles successfully when I’m using GitHub Action’s x86 runner. Not sure what went wrong, though, but I’m more concerned about the build performance.
Here are some comparisons between GitHub Action’s native x86 and QEMU-emulated AMD64 Docker build time:
#15 [linux/amd64 6/6] RUN cargo install --path . --root /usr/local
...
#15 801.9     Finished `release` profile [optimized] target(s) in 13m 21s
#15 DONE 802.2s
#18 [linux/arm64 6/6] RUN cargo install --path . --root /usr/local
...
#18 6604.9     Finished `release` profile [optimized] target(s) in 110m 04s
#18 DONE 6605.2s
The time taken for QEMU emulated build is 8x the native’s.
Time to look for a solution.
Managed remote builder
After some research, I found out about the existence of managed remote builders and some fantastic products out there:
Basically, they allow me to submit Docker build requests locally and they will use their powerful native architecture machine to perform the task. This way, I do not need to keep pushing my changes to GitHub just to use the runner.
They even provide a drop-in replacement for GitHub Action runner to benefit from their performant machine. I was amazed by the build speed, considering how much time it took for GitHub Action runner.
However, the downside is they are pretty expensive for my occasional use case. Docker Build Cloud costs $6/month with 200 build minutes included, and every 500 minutes after that will cost $25. They bill by minute, so if I run a command that only takes 15 seconds, they will bill me for the entire minute.
For depot.dev, their bill by second and plan starts at $20/month with 500 Docker build minutes and 2000 GitHub Action minutes.
Considering the cost, they aren’t the best solution for my use case. Don’t get me wrong, they are still an amazing product, and I highly recommend people to try them.
GitHub Action drop-in replacement styled products
I then found out about products like runs-on and ubicloud. They provide a drop-in replacement for GitHub Action runner with an affordable price and a huge performance bump. runs-on even lets you self-host your runner at your AWS infrastructure.
But this will require me to push my changes to GitHub every time I need to test something, which is something I don’t like. I don’t like pushing untested and half-baked code with some random commit messages.
About to give up
At this point, I was already planning to surrender to one of the methods above. Then I found out about this article from blacksmith.sh. It’s a tutorial on how to set up a remote BuildKit instance. A BuildKit instance is a remote machine ready to accept the client’s Docker build job. In the article, the author mentioned a few downsides:
- Lack of autoscaling. Projects with many devs will overload the machine, but I’m just a solo dev, so it’s not an issue.
- Cost. Running the instance 24⁄7 is expensive and I didn’t purchase Bitcoins when I was young, damnit. I can only afford it if it’s not running 24⁄7.
- Security (in terms of projects isolation and contamination). Again, I’m a solo dev, so it should not be an issue.
I wanted something that was affordable, fast and available to me when I needed it. Obviously, it’s too much to ask for when people spent countless time and resources building the above-mentioned products. Then I thought to myself, okay, why don’t I do it myself.

Architecture
My plan is to replicate what depot.dev is currently doing by combining the idea from runs-on.com and the Terraform code provided in the blacksmith.sh article. The code provided only creates an EC2 instance with some IAM policies. It’s far from what I am trying to achieve, but it served as a good starting point.
1. Caching
Since I want to create on-demand, short-lived instances, caching is a must. With caching, I can skip those unchanged layers when I run the build command in a new ephemeral machine.
I decided to use S3 as the cache storage backend due to the following reasons:
- Docker supports it
- It’s fast, especially for large objects
- I can configure lifecycle policy to housekeep old data
- Data egress to EC2 is free (within the same region)
Creating an S3 bucket and its access policy is straightforward; just dig through the Terraform documentation and ask GPT sensei to draft it for me.
resource "aws_s3_bucket" "build_cache" {
  bucket = var.bucket_name
}

resource "aws_s3_bucket_versioning" "versioning_example" {
  bucket = aws_s3_bucket.build_cache.id
  versioning_configuration {
    status = "Disabled"
  }
}
resource "aws_s3_bucket_lifecycle_configuration" "delete_seven_days" {
  bucket = aws_s3_bucket.build_cache.id

  rule {
    id     = "housekeeping-rule"
    status = "Enabled"
    expiration {
      days = 7
    }
    abort_incomplete_multipart_upload {
      days_after_initiation = 1
    }
  }
}


resource "aws_iam_policy" "s3_access_policy" {
  name = "${var.bucket_name}_s3_access_policy"

  policy = jsonencode({
    Version = "2012-10-17",
    Statement = [
      {
        Action = [
          "s3:GetObject",
          "s3:PutObject",
          "s3:ListBucket"
        ],
        Effect = "Allow",
        Resource = [
          "arn:aws:s3:::${var.bucket_name}",
          "arn:aws:s3:::${var.bucket_name}/*"
        ]
      }
    ]
  })
}
(I’m just showing the partial code here; please refer to the GitHub link at the end of the blog post for the complete source code.)
2. Startup script and AMI
The user_data argument in the aws_instance resource is a script that will run during instance startup. In the article, it installs all the dependencies, such as docker, git and the buildkit daemon. I don’t want to waste time waiting for the script to be completed every time I launch a new instance, so I decided to create an AMI with all the required dependencies.
My initial approach was to manually create the AMI via AWS console after the instance creation, then replace the AMI argument in the terraform file and modify the user_data argument to remove the installation of dependencies.
-  ami           = "ami-06b21ccaeff8cd686"
+  ami           = "<newly-created-ami-id>"

 user_data = <<-EOF
 #!/bin/bash
 set -e

-    # Update and install dependencies
-    yum update -y
-    yum install -y docker git-

-    # Start and enable Docker
-    systemctl start docker
-    systemctl enable docker

-    # Add ec2-user to the docker group
-    usermod -aG docker ec2-user

-    # Download and install BuildKit
-    export BUILDKIT_VERSION=0.12.0
-    curl -sSL "https://github.com/moby/buildkit/releases/download/v$${BUILDKIT_VERSION}/buildkit-v$${BUILDKIT_VERSION}.linux-amd64.tar.gz" -o buildkit.tar.gz
-    tar -xzf buildkit.tar.gz -C /usr/local/bin --strip-components=1

-    # Create buildkitd systemd service
-    cat <<EOT > /etc/systemd/system/buildkitd.service
-    [Unit]
-    Description=BuildKit daemon
-    After=network.target

-    [Service]
-    ExecStart=/usr/local/bin/buildkitd --addr tcp://0.0.0.0:9999 --addr unix:///run/buildkit/buildkitd.sock --debug
-    Restart=always

-    [Install]
-    WantedBy=multi-user.target
-    EOT

-    # Enable and start buildkitd service
-    systemctl daemon-reload
-    systemctl enable buildkitd
-    systemctl start buildkitd
+    curl -fsSL https://tailscale.com/install.sh | sudo sh
+    tailscale up --authkey ${var.tailscale_auth_key_x86} --ssh
 EOF
This worked well for me initially, but when I tried to write the README.md document, I noticed that it’s too troublesome to do all the steps manually and it’s prone to error.
Then I discovered Packer, a product by HashiCorp. It allows me to automate the AMI creation process by having everything defined as a code.
After using Packer, the only thing that I need to change is the AMI id.

Oh, one more thing: I added Tailscale installation script in the user_data. Tailscale is a VPN solution that allows me to connect to my instance in an encrypted tunnel.
By default, the launched EC2 instance will have a different public IP and will listen to the internet. Anyone can submit a job to it and the communication is in plain TCP connection. By having a VPN, I can configure a static private IP to it and make sure the machine only listens to the VPN interface for the buildkit daemon port.
3. Building multiarch image
Until now, my initial plan to speed up x86 build was completed. I can build ARM64 images on my laptop and x86 on EC2, each with different tags. In the future, if I ever need to have it in the same tag, I can manually merge the manifest locally.
A few days later, I came across the building-multi-platform-images section on Docker Buildx’s GitHub page. I found out that buildx actually supports multiple machines for one remote builder. Quoting the code below:
$ docker buildx create --use --name mybuild node-amd64
mybuild
$ docker buildx create --append --name mybuild node-arm64
$ docker buildx build --platform linux/amd64,linux/arm64 .
Even better, buildx will merge the manifest list at the end of the build process, creating only one tag.
 => => pushing manifest for docker.io/chenghuilee/test                                                                                                                   0.5s
 => [auth] chenghuilee/test:pull,push token for registry-1.docker.io                                                                                                     0.0s
 => [auth] chenghuilee/test:pull,push token for registry-1.docker.io                                                                                                     0.0s
 => exporting cache to Amazon S3                                                                                                                                         0.3s
 => => preparing build cache for export                                                                                                                                  0.3s
 => => writing layer sha256:e8a6201eadeed9bd2ba220753a6d46c67c023ec38c95465766b2f1b2c95d5345                                                                             0.0s
 ...
 => => writing layer sha256:074e9d132fb53a6d0f4c8ecfaf8169785ea4008d95d9aeb2fc1246b6a8335c2b                                                                             1.9s
 => merging manifest list chenghuilee/test:test                                                                                                                          3.8s
So I added 1 EC2 instance to my stack and assigned a static IP for it. I edited the existing remote builder to add the new runner’s IP.
4. VPC, subnet and security group
By default, AWS creates a default VPC in each region and x number of subnets in the VPC (depending on the number of AZ). This project will still work when deployed to the default VPC, but I prefer to have it separated from the default one.
I created a VPC in my preferred region and one subnet in each of the AZs. I also have 1 routing table that points S3 prefix list to my S3 gateway endpoint (discussed in the next section). Internet gateway is created to handle all other traffic (0.0.0.0/0).
In the EC2 security group, I configured the inbound rules to only listen to Tailscale CIDR range on port 9999 (buildkit daemon) and 22 (ssh). This ensures that only I can access the buildkit daemon and SSH into the instance when I’m connected to Tailscale.
  ingress {
    from_port   = 9999
    to_port     = 9999
    protocol    = "tcp"
    cidr_blocks = ["100.64.0.0/10"] # Tailscale VPN CIDR
  }

  ingress {
    from_port   = 22
    to_port     = 22
    protocol    = "tcp"
    cidr_blocks = ["100.64.0.0/10"] # Tailscale VPN CIDR
  }
5. S3 gateway endpoint
To be honest, I have no idea how S3 egress charge works in the same region. On the S3 pricing page, it is mentioned that data transferred from S3 to resources in the same region is free. Quoting them below:
You pay for all bandwidth into and out of Amazon S3, except for the following: Data transferred from an Amazon S3 bucket to any AWS service(s) within the same AWS Region as the S3 bucket (including to a different account in the same AWS Region).
However, I stumbled upon this article saying that a gateway endpoint is required so that the traffic will flow directly to S3 without routing to outer internet.
When I tried to traceroute S3 from my instance (both are in the same AWS region), I got a few hops, indicating my traffic is not directly hitting S3. I dug further and found an article from AWS indicating that the network traffic doesn’t go over the internet when resources are in the same region.
Both articles contradict each other.
Back to the AWS pricing page, does it mean that even though my traffic passed through a few hops, as long as the destination is within the same region, it will be free?
I’m not too sure.
So to be safe, I created a gateway endpoint that is free. This ensures that my traffic will reach S3 directly. After deploying the endpoint, I did a traceroute and confirmed that no intermediate hops were in between.
Final outcome
Combining all the points above, the architecture looks something like below:
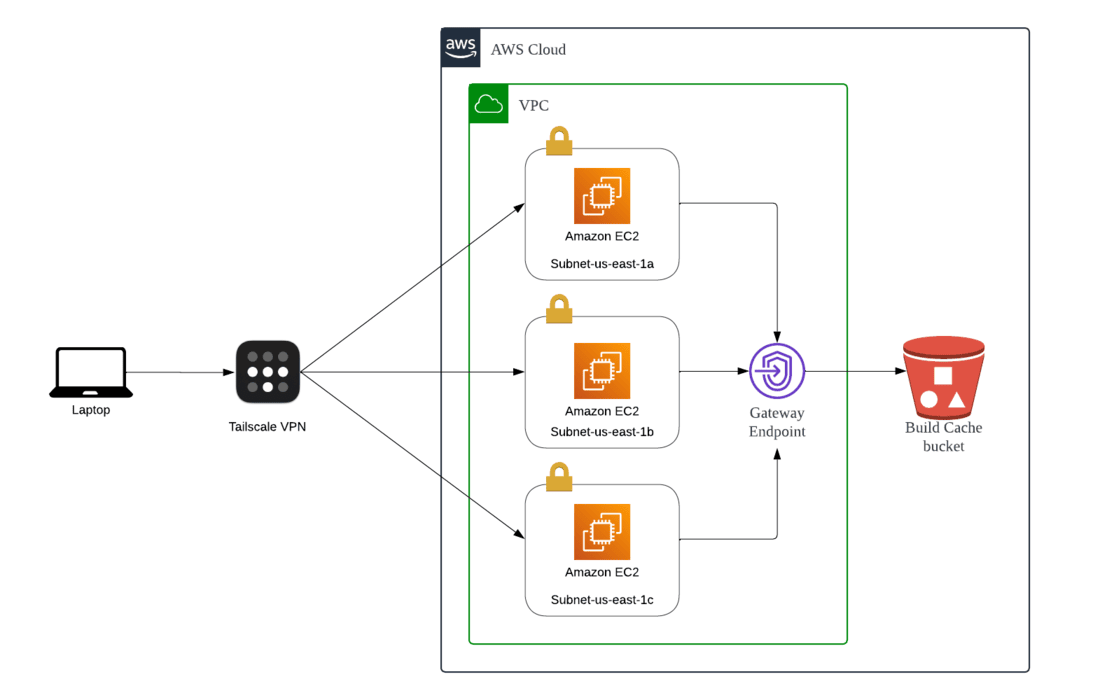
To save time, I will only destroy the EC2 and recreate them as needed. Other resources can be kept as they are inexpensive/free.
Source code and running instructions
The source code for the Terraform and Packer configuration is available on my GitHub, https://github.com/chenghui-lee/OnDemandBuildKit.
Lessons learnt
Building this project has been a fulfilling and fun learning journey for me. To summarise my learning in points:
- How to use Packer
- How to use Terraform
- AWS VPC, subnets, route tables and gateway endpoint
- Emulation is slow, even on Apple Silicon machine
- How to build multiarch image
- Should have bought Bitcoins early, jk; please don’t take my advice on this
I hope you like this article. Thank you so much for reading this far, and I’ll see you in the next one.